VICN/Tutorial/Internet2GlobalSummit2017
Introduction
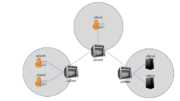
In this tutorial, we will explore multiple characteristics of ICN using various tools of the CICN suite. We will deploy a topology containing a core network linking three local networks (e.g., 3 universities on the Internet2 network). In the studied scenario, two servers in university 3 are producing data that researchers at university 1 and 2 need to access.
You should have been given access to a preconfigured Linux instance. Make sure that you have root access:
$ sudo -v
During this tutorial, we will use the Linux screen command. It is used to have several bash sessions on the same tty (in our case, on the same SSH connection). You can learn more about screen by reading its manual
$ man screen
vICN bootstrap
First, we will use vICN to start a topology. To do so, we will open a new screen called "vicn" and run our topology in it:
$ screen -S vicn
$ cd ~/vicn
$ sudo vicn/bin/vicn -s examples/tutorial/tutorial04-caching.json
You will see a lot of debugging appearing on the console, which describes what vICN is currently doing. In this tutorial, we will not get into the meaning of this logs but you are welcome to study it on your own to understanding everything that vICN does. You can detect that vICN has performed all his tasks when the log stops. The last lines should be similar to:
2017-04-18 14:24:49,845 - vicn.core.task - INFO - Scheduling task <Task[apy] partial<_task_resource_update>> for resource <UUID MetisForwarder-BS3XG>
2017-04-18 14:24:49,846 - vicn.core.resource_mgr - INFO - Resource <UUID MetisForwarder-BS3XG> is marked as CLEAN (245/202)
You can now observe the topology by connection to your machine HTTP server (we recommend that you use Google Chrome or Chromium, as Firefox does not always handle Javascript very well).
